At the
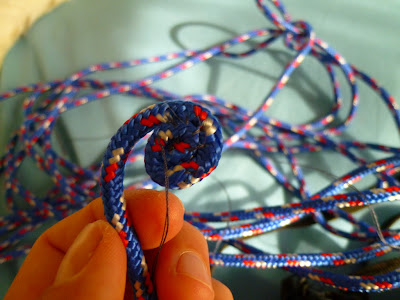
craft sale, I used a blue nylon rope to tie up buntings, pictures and signs.
After the sale, the rope was just lying there… and every day I thought of what to do with it… a necklace with carabiner hook, a coaster or should I further braid it?
Eventually I decided to try my luck with a rope bowl and simply started sewing around, around and around :) I believe that this kind of bowl can also be glued together, but personally I prefer sewing over messing around with the glue gun.
,
First I made one flat disk, than I started building up the sides and eventually I sewed it inwards again, to reach a more natural, tribal form.
.
I also make
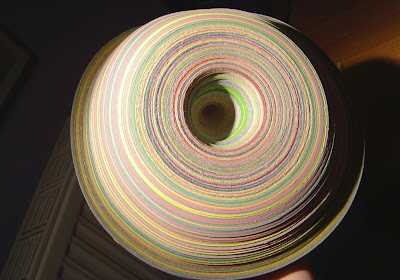
paper streamer bowls and there are advantages and disadvantages in both forms.
.
Paper bowls are looking more sculpted, like pottery, while the rope is a bit softer and doesn’t hold the form in the same way.
And with paper bowls, I’m first only rolling a disk and then I start sculpting it in the required form, all the time risking that everything will break apart, before I can paint or glue it in from.
Rope bowls are immediately stitched and therefore fixed in the form I imagine it to have, but there is not so much place for mistakes. On the other hand they seem to be more stable than paper, allowing for higher bowls and they can be placed inwards, making the opening smaller again, while paper streamer bowls, are just going wider and wider or you have to glue and roll it at the same time, which might be quite messy again (yes, I don’t like glue :)
One advantage of the ropes is, that they are so broad, so just a little bit of sewing gives you instant gratification of all the ‘work’ you did :)
.
I needed a couple of days for this bowl, but not because it is so complicated, I simply just sewed maybe half an hour per day. Once it was ready, it immediately got used for all kind of buttons and odd items, which I will eventually use in a project and are otherwise getting collected somewhere. Now I have one place for all of them (and I'm still trying to figure out the best lid for my bowl, or handles… again with rope, or leather, nylon?)
Yesterday I went to the Home Improvement Market to buy complete rope bundles… Now I have 200 feet of different sized ropes at home…. new rope bowls and baskets can be expected sooner-ish :)
.
Bei meinem vor dem Haus Verkauf, benutzte ich ein blaues Nylonseil um daran Wimpelketten, Bilder und Sonstiges aufzuhängen.
Danach lag das Seil einfach nur so herum und ich dachte jeden Tag darüber nach, was ich aus dem schönen blauen Seil so alles machen könnte... eine Halskette mit großem Karabiner-Haken-Verschluß, ein Untersetzer oder sollte ich es flechten?
Letztlich entschied ich mich dazu, eine Schale daraus zu nähen, etwas was ich noch nie gemacht habe... und so begann ich das Seil im Kreis zu rollen und dabei festzunähen. Ich denke, daß man so eine Schale auch gut mit der Heißklebepistole hinbekommt, doch ich bin kein Fan von Kleber.
Zuerst machte ich eine flache Scheibe und dann begann ich die Seiten aufzubauen. Ab einer bestimmten Höhe und Breite, begann ich die Öffnung wieder zu verkleinern und nähte so nach innen um dem Ganzen eine etwas organischere Form zu verleihen (und auch um mit dem für mich neuen Material herumzuspielen ;).
.
In der Vergangenheit habe ich häufig Luftschlangen-Schalen gewickelt, beide Formen ähneln sich und sind doch ganz anders.
Schalen aus Luftschlangen sehen definierter aus, eher als wären sie getöpfert worden, während das Seil weicher ist und die Form immer etwas einsinkt. Außerdem wickle ich bei den Luftschlangen zuerst eine große Scheibe und biege sie dann in die gewünschte Form. Dabei riskiert man stets, daß alles wieder zerbricht. Die Seilschalen werden sofort in der gewünschten Form genäht, das lässt wenig Möglichkeiten um Fehler auszubügeln. Auf der anderen Seite sind sie stabiler als Papierschalen, man kann damit große Schalen oder sogar Körbe nähen und man kann die entstandene Öffnung wieder verkleinern, etwas das bei Papier nur mit sehr viel Klebstoff und Aufwand möglich ist.
Ein großer Vorteil des Seils ist, daß es so breit ist. Dadurch erreicht man schon mit ein wenig Nähen das Gefühl von: Oh, so viel geschafft :)
Ich brauchte ein paar Tage um diese Schale zu nähen, aber nicht weil es so kompliziert war, sondern weil ich immer nur eine halbe Stunde pro Tag damit beschäftigt war. Wenn man weiß in welche Form es gehen soll, kann man so eine Schale wahrscheinlich bequem in 1 oder 2 Stunden fertig nähen :)
Sobald diese Schale fertig war, bekam sie sofort eine Funktion und beherbergt Knöpfe und andere Mini-Artikel, die sich hier und dort ansammeln und auf einen Einsatz in irgendeinem Projekt warten. Jetzt überlege ich nur noch, ob die Schale so fertig ist oder noch einen Deckel und Henkel benötigt. Der Deckel könnte erneut aus Seil gerollt werden... und für die Henkel hätte ich noch ein paar alte Ledergürtel zum Zerschneiden da.
.
Gestern ging ich den Baumarkt und kaufte drei verschiedene Seilbündel. Jetzt warten 60 m neues Nylonseil auf baldige Verwendung :))


 .
.


